Villagers are the lifeblood of any thriving Minecraft settlement, and their houses are more than just decorative structures, they’re functional hubs that determine population growth, trading opportunities, and the overall vibe of your world. Whether you’re hunting for naturally generated villages, planning a custom build, or trying to figure out why your villagers won’t stay put, understanding how villager houses work is essential.
This guide covers everything from locating villages across different biomes to constructing your own villager housing from the ground up. You’ll learn the mechanics behind what makes a house “valid” for villagers, explore design variations inspired by each biome, and discover how to protect your investment from zombie sieges and pillager raids. If you’ve ever wondered why a villager ignored your perfectly crafted home or how to maximize breeding efficiency, you’re in the right place.
Table of Contents
ToggleKey Takeaways
- A valid Minecraft villager house requires only a bed with two air blocks above it; villagers will claim unclaimed beds within 48 blocks horizontally and link to them as their home.
- Villages naturally generate in plains, desert, savanna, taiga, and snowy tundra biomes, with house designs adapted to local materials—oak for plains, sandstone for deserts, and spruce for taiga regions.
- Workstations determine villager professions and unlock specific trades; place one workstation per villager to prevent them from claiming the wrong station and ruining your trading setup.
- Successful villager breeding requires at least one bed per existing villager plus an extra unclaimed bed for each baby, along with food sharing to trigger the ‘willing’ state.
- Protect your settlement by lighting interiors to light level 1 or higher to prevent mob spawns, using iron doors against zombie breaks on Hard difficulty, and manually spawning Iron Golems with four iron blocks and a pumpkin for village defense.
- Common failures like blocking bed access, ignoring lighting, building isolated houses beyond detection range, and overcrowding workstations can prevent villagers from claiming homes and destabilize your village economy.
Understanding Villager Houses in Minecraft
What Makes a House a Villager House?
A villager house isn’t just four walls and a roof. In Minecraft’s logic, a structure becomes a valid house when it contains a bed that a villager can claim. The bed acts as the anchor point, without it, no matter how elaborate your build, villagers won’t recognize it as housing.
Doors used to play a critical role in village mechanics before the Village & Pillage update (1.14), but that system was completely overhauled. Now, villagers link to beds and workstations instead of counting doors. A single villager can claim one bed, and they’ll pathfind to it at night. If a bed is obstructed or destroyed, the villager loses their home status until they find another unclaimed bed.
The structure itself can be any shape or size. Villagers don’t care about aesthetic appeal, they care about accessibility. As long as they can reach the bed and there are no blocks directly above it preventing them from waking up, the game considers it valid housing. This flexibility is what makes custom villager house designs so rewarding.
Different Villager House Types by Biome
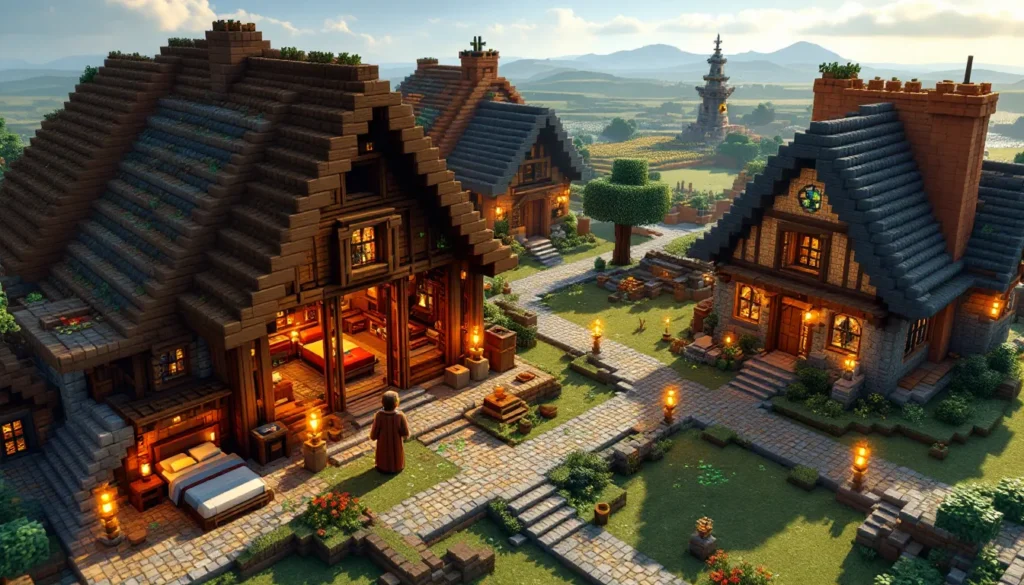
Naturally generated villages adapt to their biome, and the house designs reflect the local materials and climate. Plains villages use oak wood and cobblestone, creating the classic medieval village aesthetic most players recognize. The roofs are steeply pitched with oak planks, and interiors are simple but functional.
Desert villages swap wood for sandstone and terracotta, with flat roofs suited to the arid environment. You’ll see smooth sandstone pillars and white terracotta accents. These houses often feel more spacious inside due to the lack of heavy wooden beams.
Taiga villages embrace spruce wood and cobblestone, with darker color palettes that blend into snowy or forested surroundings. Roofs are steep to handle snowfall, and many houses include decorative campfires or cauldrons outside.
Savanna villages use acacia wood, creating warm orange-brown structures that stand out against the golden grass. The architecture here tends toward blocky, angular designs.
Snowy tundra villages mirror taiga builds but incorporate more snow and ice into the design, with igloos sometimes appearing alongside traditional wooden houses. Each biome variation offers unique inspiration when planning minecraft village buildings for your own settlements.
How to Find Villager Houses Naturally
Village Locations and Biome Variations
Villages generate in plains, desert, savanna, taiga, and snowy tundra biomes. They don’t spawn in forests, jungles, or mountainous terrain, though you might find a village partially extending into these areas if the seed allows.
The easiest biome for village hunting is plains, where the flat terrain makes villages visible from a distance. Desert villages are equally visible but require more travel since deserts tend to be large. Taiga and snowy villages blend into their surroundings, making them harder to spot without climbing to high ground.
Villages always generate with at least one meeting point (a bell) and several houses. The number of structures varies, some villages have just three or four buildings, while others sprawl across dozens of chunks with farms, libraries, and blacksmith forges. Larger villages mean more villagers and better loot potential.
If you’re exploring manually, stick to open biomes and use high vantage points. Villages render at a decent distance, so climbing hills or building a quick tower every few hundred blocks helps. Look for clustered lights at night, torches and lanterns from village houses create noticeable light sources.
Using Seeds to Locate Villages Quickly
Seeds are the fastest way to guarantee village access from spawn. Websites like Twinfinite regularly compile lists of verified seeds with villages at spawn or within a few hundred blocks. Plug one into your world generation settings, and you’ll land right next to a functioning village.
For Java Edition, you can also use tools like Chunkbase to input your seed and locate every village in your world before you even load in. This is especially useful if you’re planning a megaproject that requires multiple villages or specific biome combinations.
Console and Bedrock players have access to curated seed lists through community resources. Some seeds place you directly inside a village with a blacksmith chest, which can include early-game diamonds or obsidian, massive advantages for speedrunning or survival challenges.
If you’re playing on an existing world and don’t want to start over, the /locate structure village_plains command (Java 1.19+) or /locate village (Bedrock) will give you coordinates to the nearest village. It’s a debug tool technically, but most players enable commands just for navigation purposes.
Building Your Own Villager House from Scratch
Essential Components: Beds, Doors, and Workstations
Every functional villager house needs a bed as the foundation. Place it inside with at least two air blocks above for the villager to stand when they wake up. The bed can be any color, villagers don’t discriminate.
Doors are optional for the house itself but recommended for controlling villager movement. A door lets you seal villagers inside at night, preventing them from wandering into danger. Use wooden doors for easy access or iron doors with buttons/levers if you want more control.
Workstations aren’t required for housing, but they’re essential if you want villagers to take on professions. A lectern creates a librarian, a blast furnace creates an armorer, a cartography table creates a cartographer, and so on. Place the workstation inside or near the house, and an unemployed villager will claim it during work hours (daytime).
One common mistake is placing multiple beds or workstations too close together. Villagers claim the nearest unclaimed bed or workstation, so spacing matters when you’re managing specific professions or breeding setups.
Step-by-Step Building Instructions
-
Choose your location. Flat ground makes building easier, but villagers can pathfind up stairs and over slabs if needed. Avoid building on edges where villagers might fall.
-
Lay the foundation. A 5×5 or 6×6 footprint works well for a single villager. You can go smaller (4×4), but it gets cramped if you’re adding a workstation and storage.
-
Build walls three blocks high. This prevents most mobs from jumping in and gives you room for windows. Use any solid block, wood planks, stone bricks, cobblestone, or even concrete if you’re going for a modern look.
-
Add a door. Place it on one wall, centered for symmetry or offset for asymmetry depending on your design preferences.
-
Place the bed inside. Position it against a wall with space in front. Villagers need to pathfind to the pillow (head) side of the bed, so don’t block that area.
-
Build a roof. Stairs and slabs are the easiest options. A simple gable roof (triangular) looks good and sheds rain. Flat roofs work too, especially for desert-themed builds.
-
Light it up. Place torches, lanterns, or glowstone inside and around the exterior. Mobs can’t spawn on light level 1 or higher (Java 1.18+), so keep it well-lit.
-
(Optional) Add a workstation. If you want the villager to have a profession, place the appropriate workstation inside. They’ll claim it during the day.
Choosing the Right Materials and Style
Materials define the aesthetic. Oak planks and cobblestone give you the classic medieval village vibe. Spruce wood with stone bricks creates a darker, more refined look. Sandstone and terracotta work perfectly for desert builds. Acacia adds warmth, while birch keeps things light and modern.
Don’t sleep on concrete or terracotta for custom colors. A villager house doesn’t have to look like a naturally generated one, modern builds using white concrete, glass panes, and polished stone can still function perfectly as long as they have a bed.
Roof material matters visually. Oak or spruce stairs are traditional, but you can use dark oak, blackstone, or even purpur for unique effects. Mixing materials, like a cobblestone base with a spruce roof, adds texture and depth.
Windows improve the look and let you check on villagers without opening the door. Use glass panes, fences, or iron bars. Just make sure openings are small enough that baby zombies can’t slip through (they can fit through one-block gaps).
Villager House Designs by Biome
Plains Village House Design
Plains houses are the Minecraft default, oak wood, cobblestone, and simple geometry. A typical plains villager house features a 5×5 or 6×6 base, three-block-high walls, and a peaked roof using oak stairs. Interiors include a bed, often a crafting table or barrel, and sometimes a flower pot or painting for decoration.
To replicate or improve on this style, stick with oak planks for walls and oak logs for corner posts. Use cobblestone for the foundation or first floor, then transition to planks above. The roof should overhang by one block on all sides, using oak stairs in a gable or hipped configuration.
Windows are small, usually single glass panes or fence posts. Doors are always wooden. For a more polished version, swap cobblestone for stone bricks and add window shutters using trapdoors.
Desert Village House Design
Desert houses lean into sandstone, smooth sandstone, and terracotta. Walls are typically smooth sandstone or white terracotta, with cut sandstone for accents. Roofs are flat or low-pitched, using sandstone slabs or stairs.
A classic desert house might have a 6×6 footprint with two-block-high walls (shorter than plains builds) and a flat roof. Decorative elements include terracotta patterns, potted cacti, and sandstone pillars at corners.
For minecraft village house ideas inspired by deserts, try mixing orange and yellow terracotta in checkerboard patterns on walls or roofs. Use sandstone stairs as trim around windows and doors. Keep interiors minimal, desert villages rarely have clutter.
Taiga and Snowy Village House Designs
Taiga houses embrace spruce wood and cobblestone, with steep roofs to handle snowfall. Walls are often spruce planks with cobblestone foundations, and roofs use spruce stairs at sharp angles. Many taiga houses include exterior campfires or cauldrons for thematic flavor.
Interiors are cozy, beds with colorful wool, bookshelves, and crafting tables. Lighting tends toward lanterns rather than torches.
Snowy variants add snow layers and packed ice to the design. Some builds incorporate blue ice or snow blocks into the structure itself. Chimneys made from cobblestone or stone bricks add visual interest, though they’re purely decorative.
For advanced builders, try a two-story taiga house with a balcony using spruce fences and slabs. Place a bell or lectern on the upper floor for a librarian’s study.
Savanna and Other Biome Variations
Savanna houses use acacia wood, which has a distinctive orange-red hue. The architecture is blockier than other biomes, less emphasis on peaked roofs, more on flat or low-slope designs. Walls are acacia planks, often with terracotta or bricks as accents.
A typical savanna house has a rectangular footprint (6×4 or 7×5), two-block-high walls, and a flat roof with a slight overhang. Decorative touches include acacia fences as railings and terracotta patterns.
For swamp-adjacent builds (though villages don’t naturally generate in swamps), consider using dark oak and mossy cobblestone. Mangrove wood (added in 1.19) works beautifully for swamp-themed custom villages.
Jungle-inspired builds (again, not natural spawns) can use jungle wood and bamboo, with vines draped over walls. Use green terracotta and moss blocks for a lush aesthetic.
Attracting and Keeping Villagers in Your Houses
How Villagers Claim Houses
Villagers claim beds automatically if they’re within detection range (roughly 48 blocks horizontally, 6 blocks vertically). When a villager detects an unclaimed bed, they’ll pathfind to it and link to it as their home. This happens during the day, villagers don’t claim beds at night.
If you’ve built a house but no villager is moving in, check these conditions:
- Is the bed accessible? Villagers need a clear path to the pillow side.
- Is the bed already claimed? Break and replace the bed to reset its claim status.
- Are there other unclaimed beds closer? Villagers always choose the nearest option.
Once a villager claims a bed, they’ll return to it every night around sunset. They’ll also hang out near their bed during rain. If the bed is destroyed, the villager loses their home and will wander until they find a new one.
Transporting villagers to your custom houses is the hardest part. Methods include:
- Minecart transport: Build rails from a village to your build site, trap a villager in a minecart, and push.
- Boat transport: Villagers can ride in boats. This works on water or ice paths.
- Nether highways: Transport via minecart through the Nether for 8x faster travel (every block in the Nether equals eight in the Overworld).
Curing zombie villagers is another option. Trap a zombie villager, splash it with a Potion of Weakness, then feed it a Golden Apple. After a few minutes, it converts to a normal villager. Cured villagers offer permanent trading discounts.
Breeding Villagers and Population Growth
Villagers breed when they’re “willing,” which requires them to have enough food (3 bread, 12 carrots, 12 potatoes, or 12 beetroots). They’ll share food with each other, so throwing food at a group works.
The second requirement is available beds. For every villager, you need one bed. For breeding, you need an extra unclaimed bed for the baby. So if you have two villagers and want them to breed, you need three beds total.
Villagers also need to be in a “valid village” state, which means they must detect beds and workstations nearby. This happens automatically if you’ve built houses with beds.
To maximize breeding efficiency:
- Build multiple houses close together (within 48 blocks).
- Place at least one bed per existing villager, plus extras for babies.
- Throw food at villagers or place a Composter (which farmers can use to generate food).
- Ensure villagers can pathfind to all beds and each other.
Babies take 20 minutes (one in-game day) to grow into adults. Once adult, they’ll claim a bed and workstation, becoming part of your trading ecosystem. Guides on IGN often cover advanced breeding setups for industrial-scale villager production.
Customizing and Upgrading Villager Houses
Interior Design and Decoration Ideas
Villagers don’t care about interior decoration, but players do. A well-decorated house makes your village feel lived-in and purposeful.
Start with functional furniture: crafting tables, barrels, chests, and bookshelves. Use stairs and slabs to create chairs and tables. Place a stair block, then put a sign or trapdoor on the side as an armrest. Slabs stacked or placed as surfaces mimic counters or desks.
Decorative blocks add character. Flower pots with flowers or saplings, paintings, item frames with maps or tools, and carpets all contribute to the aesthetic. Lanterns or sea lanterns provide better lighting than torches and look cleaner.
For themed interiors, match the biome. A desert house might have terracotta rugs, cactus in pots, and sandstone furniture. A taiga house could feature spruce accents, a fireplace (decorative campfire or actual furnace), and bookshelves for a cozy library vibe.
Storage solutions are practical and decorative. Use barrels instead of chests for a more rustic look, or shulker boxes if you’re in the endgame. Label chests with item frames to organize resources.
For advanced builders, redstone contraptions like hidden doors, lighting systems, or automatic farms add functionality. A villager house with a built-in crop farm or automatic smelter becomes a mini production hub.
Adding Workstations for Specific Professions
Workstations determine villager professions, which dictates their trades. Here’s the full list:
- Armorer: Blast Furnace
- Butcher: Smoker
- Cartographer: Cartography Table
- Cleric: Brewing Stand
- Farmer: Composter
- Fisherman: Barrel
- Fletcher: Fletching Table
- Leatherworker: Cauldron
- Librarian: Lectern
- Mason (Stonemason): Stonecutter
- Shepherd: Loom
- Toolsmith: Smithing Table
- Weaponsmith: Grindstone
Place the workstation in or near the house. An unemployed villager (one without a workstation) will claim it during work hours (8 AM to 5 PM in-game). Once claimed, the villager’s profession locks in after their first trade.
To optimize, build specialized houses. A librarian house might have multiple lecterns and bookshelves for thematic consistency. A toolsmith house could include an anvil, grindstone, and smithing table.
If you’re building a trading hall, you’ll want one workstation per villager, each in a separate cell or room. This prevents villagers from claiming the wrong workstation and messing up your profession assignments.
Protecting Villager Houses from Threats
Defense Against Zombies and Raids
Zombies will pathfind to villagers and break down wooden doors on Hard difficulty. If you’re playing on Normal or Hard, either use iron doors (which zombies can’t break) or reinforce your defenses.
Iron Golems are the primary defense mechanism. A village spawns an Iron Golem when it has at least three villagers and three beds (or when enough villagers panic). Golems patrol the area and attack hostile mobs on sight. If you’ve built a custom village, you can manually spawn golems by placing four iron blocks in a T-shape and putting a carved pumpkin or jack o’lantern on top.
For raids (triggered when a player with the Bad Omen effect enters a village), preparation is critical. Raids spawn waves of pillagers, vindicators, evokers, and ravagers. Enclose your village with walls or fences, place bells to alert you when raids start, and stockpile weapons and armor.
Advanced players build raid farms to exploit this mechanic for XP and loot, but for standard survival, focus on containment. Keep villagers indoors during raids, and use chokepoints to funnel mobs into kill zones.
Community resources like Game Rant provide detailed raid defense strategies, including bunker designs and mob-proofing techniques.
Lighting and Barrier Strategies
Mobs spawn at light level 0 (Java 1.18+), so keep your village lit to light level 1 or higher. Torches are the easiest option, but lanterns, glowstone, sea lanterns, and redstone lamps all work.
Place light sources every few blocks along pathways, around house perimeters, and on rooftops. Don’t forget to light the interiors, zombies can spawn inside dark buildings.
Fences and walls create physical barriers. A two-block-high fence prevents most mobs from entering (spiders can climb, but they won’t if there’s an overhang). Use spruce fences for taiga villages, acacia for savanna, or cobblestone walls for medieval builds.
Gates provide controlled entry points. Place a fence gate at village entrances and keep it closed at night. Iron doors with buttons or pressure plates (inside only) prevent mobs from following you in.
For added security, dig a trench or moat around the village perimeter. A two-block-deep trench stops most mobs. Fill it with water for aesthetics, or leave it dry and place campfires at the bottom to damage anything that falls in.
Trapdoors on windows prevent mobs from jumping in while still allowing you to see outside. Place them on the exterior side of the window and leave them open, mobs treat open trapdoors as solid blocks and won’t path through.
Common Mistakes to Avoid When Building Villager Houses
Forgetting the bed. It sounds obvious, but players sometimes focus on aesthetics and forget the one block that makes a house functional. No bed, no villager home.
Blocking bed access. Villagers need to reach the pillow side of the bed. Don’t place blocks, chests, or decorations that obstruct pathfinding. If a villager can’t path to the bed, they won’t claim it.
Building too far from other structures. Villagers detect beds and workstations within a limited range (roughly 48 blocks horizontally). If your house is isolated, villagers won’t link to it unless you transport them manually.
Using beds that are already claimed. In existing villages, all beds are usually claimed. Break and replace beds to reset them, or bring new beds from your base.
Ignoring lighting. Dark houses spawn mobs, which can kill villagers or turn them into zombie villagers. Light up interiors and exteriors to prevent this.
Overcrowding workstations. If you place multiple workstations too close together without isolating villagers, they’ll keep switching professions as they re-claim different stations. This is a nightmare for trading setups. One villager, one workstation, clearly defined.
Building in unprotected areas. If your village isn’t enclosed or defended, zombies will pick off villagers one by one. Invest in walls, lighting, and golems before you start breeding.
Not accounting for baby zombie reach. Baby zombies can fit through one-block gaps. If your windows or fences have single-block openings, they can get in. Use trapdoors or glass panes to seal gaps while maintaining visibility.
Assuming villagers will stay put. Villagers wander during the day. If you want them to stay in specific houses, use fences, gates, or minecarts to restrict movement. Alternatively, build in a confined area where they can’t stray far.
Skipping the bell. While not required for individual houses, a bell defines the village center and helps organize villager behavior. It also alerts you during raids. Place one in a central location for smoother village management.
Conclusion
Building and managing villager houses in Minecraft is a blend of game mechanics and creative expression. Whether you’re replicating biome-specific designs, constructing a custom trading hub, or just trying to keep your villagers alive through the night, the core principles remain the same: beds for housing, workstations for professions, and defenses to keep threats at bay.
The flexibility of Minecraft’s building system means your villager houses can be as simple or elaborate as you want. A 4×4 dirt shack with a bed works just as well mechanically as a multi-story mansion with redstone lighting. What matters is understanding the underlying mechanics, pathfinding, bed claims, profession assignments, and applying them to your vision.
As you expand your villages, experiment with different materials, layouts, and defensive strategies. Each biome offers unique aesthetic opportunities, and custom builds let you push beyond the game’s default designs. With the right planning, your villager houses can become the foundation of a thriving, efficient settlement that supports all your trading, farming, and automation needs.


